Regularly when we launch a new site we also put up a static scrape of the old site so that users can access content that has been removed from the new site. Commonly this is old news content that the client want’s to keep available for a transition period, but doesn’t want cluttering up the new site.

This is fairly straightforward – feed an application such as SiteSucker a URL, tweak a few settings and let it loose. The resulting files can be dropped into a /archive/ folder and a link put on the site to direct users there for old content.

The most common hitch we hit, is when the old site was hosted on a Windows server as IIS is, largely, case insensitive. This means that /folderone/image.jpg and /FolderOne/image.jpg will both resolve to the same file. Apache however is case sensitive and will treat those 2 as different paths resulting in broken links in our archive. This won’t necessarily be a problem, but the fact IIS doesn’t mind means that the developers and site maintainers can be a little sloppy with their capitalisation, and there are often multiple versions used.

Configuring apache to be case insensitive

I personally consider case sensitivity to be appropriate normally, but it is possible to allow Apache to match case insensitivly using mod_speling (and no, I haven’t mistyped ‘spelling’…). Mod_speling is included as part of the standard Apache module bundle, but may not be activated. You can check with apache2ctl -M and if you don’t see it, enable it with a2enmod speling and then restart apache with service apache2 restart (these commands might vary depending on which OS you are running).

Now it’s available for use, it needs to be enabled within your vhost configuration or in .htaccess. Since I only want it to affect /archive/ I created a .htaccess file there and added:

<IfModule mod_speling.c>
    CheckCaseOnly on
    CheckSpelling on
</IfModule>

Counterintuitively this tells mod_speling to only check for case mis-matches and not attempt to correct misspellings – there’s a full explanation of how to use mod_speling in the official documentation for it.

Problems with rewrites

This works fine, unless the root site is using rewrites – as any installation of a CMS will be. This is because mod_rewrite prevents mod_speling from working; but as long as you don’t need rewrites in /archive/ the solution is simple – turn off the rewrite engine in that directory. Just add RewriteEngine off to the start of /archive/.htaccess before the mod_speling block:

RewriteEngine off
<IfModule mod_speling.c>
    CheckCaseOnly on
    CheckSpelling on
</IfModule>
Advanced Custom Fields (ACF) is a great WordPress plugin for adding custom meta fields. It has a very useful relationship field that can be used to denote a connection from one post to another – importantly this is a one-way relationship. When you are on PostA you can generate a list of all the posts that it is linked to.

Going in reverse

ACF documentation highlights how a clever WP_Query can be used to do a `reverse query`, i.e. when you view PostB you can get a list of all the posts that link to PostB.

What about sub-fields

The reverse query works fine as it is for top level fields, but does not work for sub-fields within, for example, a repeater. Luckily Elliot on the ACF support forum shared some code for doing a reverse query against a sub-field.
The key is just using a LIKE for the meta query.

Note – for a Relationship field, where the value is a serialised array, use:

'meta_query' => array(
	array(
		'key' => 'fieldName', // name of custom field
		'value' => '"' . get_the_ID() . '"', // matches exaclty "123", not just 123. This prevents a match for "1234"
		'compare' => 'LIKE'
	)
)

but for a Post Object field, where the value is an integer, use:

'meta_query' => array(
	array(
		'key' => 'fieldName', // name of custom field
		'value' => get_the_ID(),
		'compare' => '='
	)
)

Latest item in repeater only

Just to get more complicated, now let’s do a reverse relationship query, against a sub-field, but only the sub-field within the latest item in the repeater…
Imagine a post type of Business that has a repeater called ‘Audit’, and within it sub-fields for ‘Audit firm’ and ‘Fee’. The ‘Audit firm’ sub-field is a relationship to another post type called Auditor. On the single Auditor pages I want to show the name of each Business who they are currently auditing, i.e., where they are the ‘Audit firm’ in the last repeater entry.

To get a list of Business post IDs we have to use a $wpdb query; the key is the use of MAX(meta_key) to get the last item in the repeater. This works because ACF names it’s repeater fields repeaterName_X_fieldName, where X is the number denoting when the item was added.

The solution

The code below is heavily based on a Stack Overflow answer from Elliot (coincidence?) with added WordPress and ACF magic and help from Luke Oatham.

$meta_key = 'audit_%_audit_firm'; // meta_key for repeater sub-field.
$meta_value = '%"'. get_the_id() . '"%'; // meta_value, wrapped for use in a LIKE.
$post_status = 'publish';
$businesses = $wpdb->get_col( $wpdb->prepare(
	"
	SELECT businessMeta.post_id // Field we want in the returned column.
	FROM $wpdb->postmeta businessMeta
	INNER JOIN
		(SELECT post_id, MAX(meta_key) AS latestAuditRepeater
		FROM $wpdb->postmeta
		WHERE meta_key LIKE '%s'
		GROUP BY post_id) groupedBusinessMeta
	ON businessMeta.post_id = groupedBusinessMeta.post_id
	AND businessMeta.meta_key = groupedBusinessMeta.latestAuditRepeater
	WHERE meta_value LIKE '%s'
	AND abMeta.post_id IN
		(SELECT ID
		FROM $wpdb->posts
		WHERE post_status = '%s')
	",
	$meta_key,
	$meta_value,
	$post_status
) );

A typical PHP snippet to create a Zip file looks something like this:

$zip = new ZipArchive();
$zipname = 'package_name.zip';
if ( true === $zip->open( $zipname, ZipArchive::CREATE ) ) {
    $zip->addFromString( 'file_name.txt', $file_contents );
    $zip->close();
    header( 'Content-Type: application/zip' );
    header( 'Content-disposition: attachment; filename=' . $zipname );
    header( 'Content-Length: ' . filesize( $zipname ) );
    readfile( $zipname );
    unlink( $zipname );
    exit;
}

But did you ever stop to think about where the temporary ‘package_name.zip’ file is created? Neither have I. What I have come across, are permissions errors when creating zip files as well as the slightly more mysterious 0Kb Zip files.

Watching the filesystem and removing the unlink() reveals that the Zip file is created in the current working directory, i.e. “the path of the ‘main’ script referenced in the URL”. For most web applications or CMS this will mean the root of the application/CMS.

This is fine when you have fairly relaxed permissions, but if things are more locked down you end up with the errors described above as the temporary file can’t be created.

A simple solution

As is so often the case the solution is actually very simple – tell PHP to move it’s working directory using the chdir() function. To keep things re-usable, we can combine chdir() with another function that returns the temporary directory specified in php.ini – which should always be writable by PHP – sys_get_temp_dir().

Below is the updated snippet, with one extra feature – it stores the temp file with a random name to reduce the liklihood of collisions if multiple people access your script at once.

chdir( sys_get_temp_dir() ); // Zip always get's created in current working dir so move to tmp.
$zip = new ZipArchive;
$tmp_zipname = uniqid(); // Generate a temp UID for the file on disk.
$zipname = 'package_name.zip'; // True filename used when serving to user.
if ( true === $zip->open( $tmp_zipname, ZipArchive::CREATE ) ) {
    $zip->addFromString( 'file_name.txt', $file_contents );
    $zip->close();
    header( 'Content-Type: application/zip' );
    header( 'Content-disposition: attachment; filename=' . $zipname );
    header( 'Content-Length: ' . filesize( $tmp_zipname ) );
    readfile( $tmp_zipname );
    unlink( $tmp_zipname );
    exit;
}

One gap in the abilities of WP CLI at the moment is the ability to modify an already existing wp-config.php file.

v1.2 introduced the --force flag to overwrite an existing one, but that is the sledgehammer option – so I started working on it myself. I have put a very initial version on GitHub and would welcome feedback and pull-requests. Please don’t use this on a live site!

Is this something you would use? What features do you think it should have? Let me know in the comments.

VPNs and proxies are great – but almost always limited to funnelling all traffic through them. But what if you want to access only a single site/domain without affecting the rest of your browsing? Perhaps to access a staging site not publically available.

While what I discuss below could be used as a privacy measure, that’s not the focus of this blog post.

You can do clever things with Web Proxy Auto Discovery Protocol (WPAD) or browser specific tools like Firefox’s Proxy Auto-Configuration (PAC) but this isn’t exactly user friendly to setup. What I was looking for was something as near to zero-configuration as possible, so I could share it with my collegues without causing problems.

In the end I came to a zip file that contains a copy of Google Chrome Canary and an Automator script to launch and configure everything.
Why Canary? Chrome let’s me configure proxy settings when launching it from a bash script; but since many of us already use it, bundling Canary allows me to avoid any clashes.

The zip is structured like this:
– ProxyAccess.app (the Automator app)
– Resources (folder)
– – Google Chome Canary.app

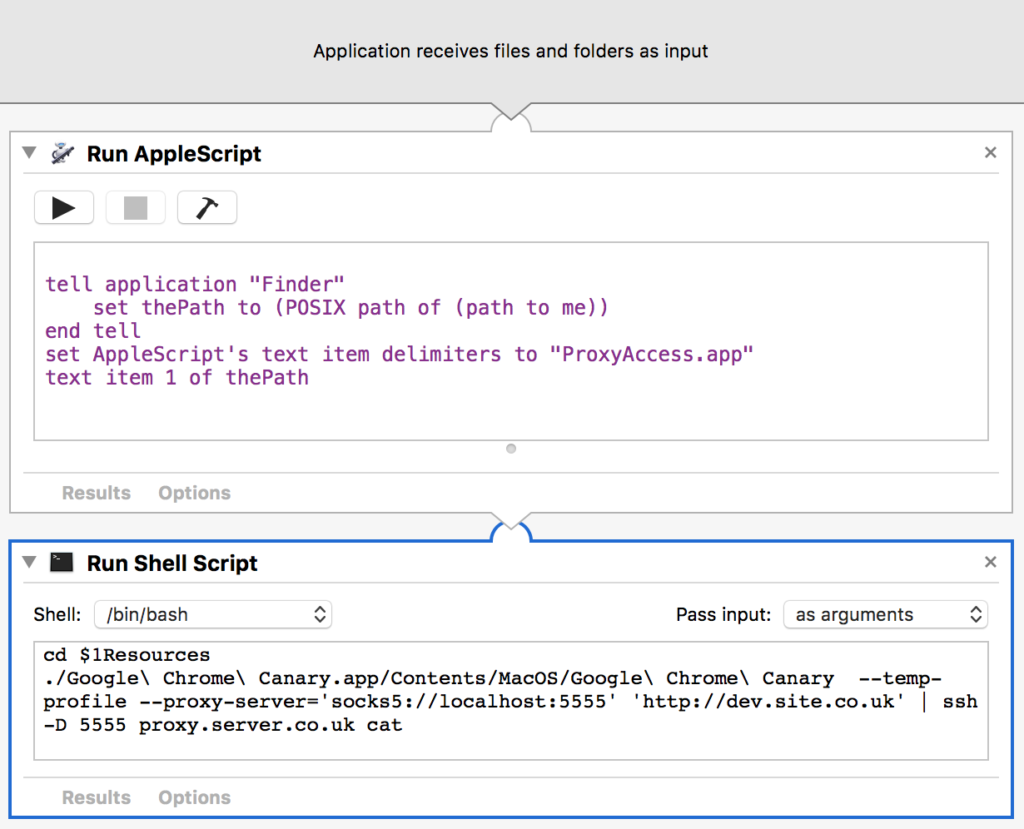
The magic is really a one line command on the Automator app that opens the SOCKS proxy, then launches the browser to the destination URL, and the closes everything when you quit Canary:

./Google\ Chrome\ Canary.app/Contents/MacOS/Google\ Chrome\ Canary --temp-profile --proxy-server='socks5://localhost:5555' 'http://dev.site.co.uk' | ssh -D 5555 proxy.server.co.uk cat

This is based of Tim Weber’s work which suggested using cat and piping the commands together to create the automatically closing proxy. http://dev.site.co.uk is the URL to be opened when Canary launches, 5555 is the port to run the proxy on, and proxy.server.co.uk is the server that we are routing traffic through.

The Automator app is very simple and looks like this:

It uses Applescript to get the current working directory, then passes that to bash so it can find the bundled copy of Canary to run.

This falls in the quick and dirty category, but it gets the job done with minimal overhead or potential impact on a users machine.

Updated 02 – 05 – 18: plugins object is now returned as an array.

On a whim this May bank holiday, tucked up on the sofa watching movies, I decided to create a plugin to display my favourited plugins on WordPress.org.

After a bit of digging I found you can use the plugins_api() function and pass it a username, e.g.:

plugins_api( 'query_plugins', array( 'user' => emirpprime, 'per_page' => '-1' ) );

This returns an object with some information about the results, then an array of plugins. A stripped down example of the structure is below:

stdClass Object
    (
    [info] => Array
        (
            [page] => 1
            [pages] => 0
            [results] => 57
        )
    [plugins] => Array
        (
            [0] => Array
                (
                    [name] => Autoptimize
                    [slug] => autoptimize
                    [version] => 2.1.0
                    [author] => <a href="http://blog.futtta.be/">Frank Goossens (futtta)</a>
                    [author_profile] => https://profiles.wordpress.org/optimizingmatters
                    [requires] => 4.0
                    [tested] => 4.7.5
                    [compatibility] => Array
                        (
                        )
                    [rating] => 94
                    [ratings] => Array
                        (
                            [5] => 419
                            [4] => 23
                            [3] => 12
                            [2] => 8
                            [1] => 22
                        )
                    [num_ratings] => 484
                    [support_threads] => 121
                    [support_threads_resolved] => 81
                    [downloaded] => 1349088
                    [last_updated] => 2016-12-14 5:45am GMT
                    [added] => 2009-07-09
                    [homepage] => http://blog.futtta.be/autoptimize
                    [sections] => Array
                        (
                            [description] => Autoptimize makes ...
                            [installation] => Just install from your WordPress...
                            [faq] => Installation Instructions...
                            [short_description] => Autoptimize speeds up your website and helps you save bandwidth by aggregating and minimizing JS, CSS and HTML.
                            [download_link] => https://downloads.wordpress.org/plugin/autoptimize.2.1.0.zip
                            [screenshots] => Array
                                (
                                )
                            [tags] => Array
                                (
                                    [css] => css
                                    [html] => html
                                    [javascript] => javascript
                                    [js] => JS
                                    [minify] => minify
                                )
                            [versions] => Array
                                (
                                    [0.1] => https://downloads.wordpress.org/plugin/autoptimize.0.1.zip
                                    ...
                                    [trunk] => https://downloads.wordpress.org/plugin/autoptimize.zip
                                )
                            [donate_link] => http://blog.futtta.be/2013/10/21/do-not-donate-to-me/
                            [contributors] => Array
                                (
                                )
                        )
                )
        )
)

A simple loop over the plugins array will get all the details about a plugin you could want.

A short while later, and a rough and ready version is complete – a basic plugin that registers a shortcode and returns a list of a user’s plugins.

What does the plugin output?

Here are my favourites as an example – the markup is basic but easy to style, with a couple of classes for targetting. I’ve kept it simpler than the layout in wp-admin or the plugin repository, but hopefully with enough info to be useful:

Found: 59

  • Add Descendants As Submenu Items by Alex Mills
    Automatically all of a nav menu item's descendants as submenu items. Designed for pages but will work with any hierarchical post type or taxonomy …
  • Autoptimize by Optimizing Matters
    Autoptimize speeds up your website by optimizing JS, CSS, images (incl. lazy-load), HTML and Google Fonts, asyncing JS, removing emoji cruft and more.
  • Block List Updater by pluginkollektiv
    Automatic updating of the comment block list in WordPress with antispam keys from GitHub.
  • Broken Link Checker by WPMU DEV - Your All-in-One WordPress Platform
    Broken Link Checker helps you catch broken links & images fast, before they hurt your SEO or UX. Scan and bulk-fix issues from one easy dashboard.
  • Bulk Add Terms by Sohan Zaman
    A lightweight plugin to add thousands of taxonomy terms in one go.
  • Classic Editor by WordPress.org
    Enables the previous "classic" editor and the old-style Edit Post screen with TinyMCE, Meta Boxes, etc. Supports all plugins that extend this screen.
  • Classic Editor + by Pieter Bos
    The "Classic Editor +" plugin disables the block editor, removes enqueued scripts/styles and brings back classic Widgets.
  • Client-proof Visual Editor by Hugo Baeta
    Simple, option-less, plugin to make TinyMCE - the WordPress Visual Editor - easier for clients and n00bs.
  • Cloudflare by Cloudflare
    All of Cloudflare’s performance and security benefits in a simple one-click install.
  • Code Snippets by Shea Bunge
    An easy, clean and simple way to enhance your site with code snippets.
  • Content Filter – Censor All Offensive Content From Your Site by gwycon
    Take control and protect your site today! Censor all content containing profanity, swearing, offensive, and abusive comments. Flexible Plugin options.
  • Custom Post Type UI by webdevstudios
    Admin UI for creating custom content types like post types and taxonomies
  • Debogger by Simon Prosser
    Debugging tool for theme authors and reviewers.
  • Developer by Automattic
    A plugin, which helps WordPress developers develop.
  • Disable Comments – Remove Comments & Stop Spam [Multi-Site Support] by WPDeveloper
    Allows administrators to globally disable comments on their site. Comments can be disabled according to post type. Multisite friendly.
  • Disable REST API by Dave McHale
    Disable the use of the REST API on your website to site users. Now with User Role support!
  • Disable WP REST API by Jeff Starr
    Disables the WP REST API for visitors not logged into WordPress.
  • Duplicator – Backups & Migration Plugin – Cloud Backups, Scheduled Backups, & More by Syed Balkhi
    The best WordPress backup and migration plugin. Quickly and easily backup ,migrate, copy, move, or clone your site from one location to another.
  • Email Address Encoder by Till Krüss
    A lightweight plugin that protects email addresses from email-harvesting robots, by encoding them into decimal and hexadecimal entities.
  • Enable Media Replace by ShortPixel
    Easily replace any attached image/file by simply uploading a new file in the Media Library edit view - a real time saver!
  •  

    What do you think? Is there any other info you think would be useful to include? Let me know in the comments.

    Just to be clear – there are no affiliate links, sponsored content or anything similar in this post.

    Recently I started taking the JavaScript for WordPress course and would highly recommend it. Not long after I received an email from them promoting their affiliate system – help advertise the course and you get a kick-back. This isn’t something I’ve ever considered before – I dislike obvious and obnoxious product placement in general and have seen too much bad practice around a lack of disclaimers online. But in this case it made me stop and actually consider it. I like the course and am enthusiastically recommending it in person and online anyway. Is there anything wrong with being part of the affiliate scheme if I’m open about it? What do you think?

    Clear styling

    Aside from my personal decision about whether to sign-up, I thought it was worth adding a style for disclaimer boxes to this theme – I can think of all sorts of uses for this, not just related to sponsorship / affiliation. The next paragraph shows an example of the styling.

    This paragraph is styled as a box, but still within the flow of content as I consider it an important part of it and relating to what comes before and or after it.
    Personally I would consider that if this related to affiliation or sponsored content, it should always go at the very start of an article and not be buried at the bottom.

    This method works well for blog posts (and content embedded within them), but what about other channels? This post on Bloggy Law has a good range of examples and some good guidance.

    The law

    If you’re in the UK you should definitely be familiar with the clear guidance from the Competitions & Marketing Authority (UK) over sponsored content, but I haven’t seen anything specific about affiliation / referral schemes. Let me know in the comments if you have seen any.

    Conversion worries

    Circling back to where this post started – will using affiliate links hurt my content? If I decide to become an affiliate it won’t be because I need the income stream, and likely there would only be a single blog post containing the link with perhaps a link to the post on social media. I would only be posting the article as I believe the content could be interesting or useful to others. Being read is the point. Would you still want to read a blog post here if it contained an affiliate link? Would you view the validity of the content any differently? It would be interesting to compare the effect on readers of a disclaimer box versus an inline warning – up front honesty versus just-in-time honesty.

    However when it comes down to it this is all academic for me. I may or may not go ahead with this scheme, but this dilemma would rarely come up – in fact, this could be the only time.

    Fancy sending your WordPress site back (or forward) in time for a day? Thanks to the multitude of filters it only takes a few lines of code. In this example I’m just going to filter the_time(), but in a future post I will also show you how to put together a more comprehensive function that uses multiple filters (and has a more practical use).

    The filter for the_time() passes two values in – the value it was going to display, and the formatting string used to create it.

    Hooking in to the filter

    This is fairly standard – pass the name of the filter we are using to the function add_filter(), along with the name of our custom function that is going to modify the value:

    add_filter( 'the_time', 'cc_time_machine' );

    However, since we need both of the arguments that the filter passes, we have to add in the optional values for ‘priority’ and ‘accepted arguments’. The default priority is ten, and as mentioned there are two arguments – so that gives us:

    add_filter( 'the_time', 'cc_time_machine', 10, 2 );

    Travelling in time:

    Now we can receive the data in our function and modify the value. None of the arguments relate to the ID of the post being dealt with, but we can use the global `$post` variable to retrieve it. Then we use the get_the_time() function to retrieve the date/time of the post in timestamp format – this makes it easy to manipulate. Let’s send everything 30 days into the past:

    $timestamp = get_post_time( 'U', true, $post );
    $adjusted = $timestamp + ( -30 * DAY_IN_SECONDS );

    Finally, we need to return the new value. Utilising the second argument ensures we format the date in the same way as it was originally requested:

    return date( $format, $adjusted );

    The complete function:

    N.B. this version reads the time travel value ($offset) from the database so it can be controlled through wp-admin.

    Jump to the bottom if you want to go straight to the script

    I recently set up a new VPS on DigitalOcean and chose to manage the web stack and sites with EasyEngine. I’m very impressed with EashEngine, but the fact it makes deploying sites so easy shows up how much overhead there is in staying on top of multiple WordPress installs.

    As the recent vulnerability in the REST API showed, keeping on top of updates is really crucial. In the past I’ve used a management system called InifinteWP, but I’ve decided I would rather use fewer tools and instead rely on WP CLI.

    The key commands

    There are four basic commands key to staying on top of updates:

    wp core check-update
    wp core update
    wp plugin list
    wp plugin update --all

    They’re self explanatory, and with these you can find out if there are any updates available, and apply them.

    Scalability

    But logging in to a server, navigating to the web directory, and running potentially four commands is not exactly time saving. Especially when you need to be doing this in a daily basis to ensure critical patches are applied as soon as possible. (Monitoring the vulnerability disclosure lists is a topic for another day.)

    Luckily we can easily automate this with a simple bash script with just a few essential steps:

    • find all WordPress installs and loop over them
    • navigate into their directory
    • run the two WP CLI commands needed to check for updates to core and plugins
    • repeat

    Once the basics work the script can be easily extended with options such as a choice between checking for updates or doing updates.

    EasyEngine hiccups

    The standard way of finding a WordPress install so you can use WP CLI is to search for wp-config.php files since you can be certain it exists. Then navigate to the directory where you found it, and execute the command.

    However, EasyEngine uses a security conscious directory structure with wp-config.php outside htdocs. This is very sensible, but impacts WP CLI the commands won’t run here – we need to move down into the htdocs directory. One solution is to just add a cd htdocs, but that would mean the script becomes specific to this server setup. Instead, just choose another core file / directory to search for – I went for /wp-admin.

    The script

    There are many ways this could be extended or customised – but this gist covers the basics and should be flexible enough to cover both EasyEngine and non-EasyEngine setups:

    Why ask when you can be told

    The last piece of the puzzle is combing the script with cron and mail.

    Instead of logging in each day to run the script and check for updates, we can use cron to run it and email the output. This means I can wait for the server to tell me when I need to log in and run an update, and not have to constantly check.

    For example, on Ubuntu you can $ sudo crontab -e then add 30 6 * * * su myuser -c '/home/myuser/wp_helper.sh | mail -s "WP Helper update checker" "myuser@domain.co.uk" # run wp_helper.sh at 0630 daily and email.' to run the script at 630 am every day and email the result. Note – this adds the cron job to the root crontab; this means that it will be run as root and so WP CLI will throw a warning. To avoid this su myuser -c runs the command as a chosen user.

    I want to review changlogs and test before updating, so am only running the script in check mode. If you are happy auto-updating you could either pass the relevant arguments to the script or use the native WordPress functions.

    WordPress has a handy get_terms() function that retrives a list of all the terms for a taxonomy – this is great if you are, for example, building a <select> box for filtering a custom post type listing page. But there’s one big problem, if you use this on a shared taxonomy, it will show all terms even if they aren’t used on the particular post type you are dealing with. There is a hide_empty argument that you can pass to get_terms, but this only excludes terms that aren’t used for the default “post” post type.

    What to do about it

    Facing this today, I ended up with this little snippet that utilises a $wpbd query along with get_terms to achieve what we want:

    • First it uses a nested select query to get the IDs for all posts in our custom post type, this is then immediately utilised by the outer select query to grab a list of term IDs from the term_relationships table
    • Then this list of IDs is passed into get_terms
    • Finally it’s output to build the select box

    You’ll also notice in there it is being cached as a transient for 4 hours. Depending on the nature of your site and server you might not need this, or may need to adjust the duration.

    The key parts to modify if you want to utilise this is post_type='cpt' on line 8 and 'taxonomy' => 'country' on line 9. These set the custom post type you want to retrive terms for, and the name of your taxonomy respectively.